 View on GitHub

E-Receipt Parsing
The BlinkReceipt SDK supports parsing e-receipts from a growing list of retailers and a specific set of mail providers: Gmail, Outlook, Yahoo, and AOL. The procedure for integrating each of these providers is slightly different. This guide will outline the steps necessary to integrate and authenticate a user account for each mail provider, and then the common methods that you will use to invoke the e-receipt parsing functionality.
The SDK supports having multiple accounts linked simultaneously with the restriction that at most 1 Gmail account authenticated via OAuth and at most 1 Outlook account authenticated via OAuth can be linked at any time.
Note
You must provide both [BRScanManager sharedManager].licenseKey (which can be obtained on a trial basis at www.microblink.com) as well as [BRScanManager sharedManager].prodIntelKey (email your point of contact or support@microblink.com if you do not have one) in order for E-Receipt Parsing to function correctly
Gmail (OAuth)
Create a new Project in the Google API Console
Enable the Gmail API for your project
Create new credentials for the API, and choose the iOS option. This should lead you through the process to create an OAuth 2.0 client ID. You will have to complete the setup of an OAuth Consent Screen.
Warning
In order to use a Gmail OAuth integration in production you must obtain Google’s review and approval of your application
- Once you have successfully completed the process, find the Client ID for your app’s bundle identifier
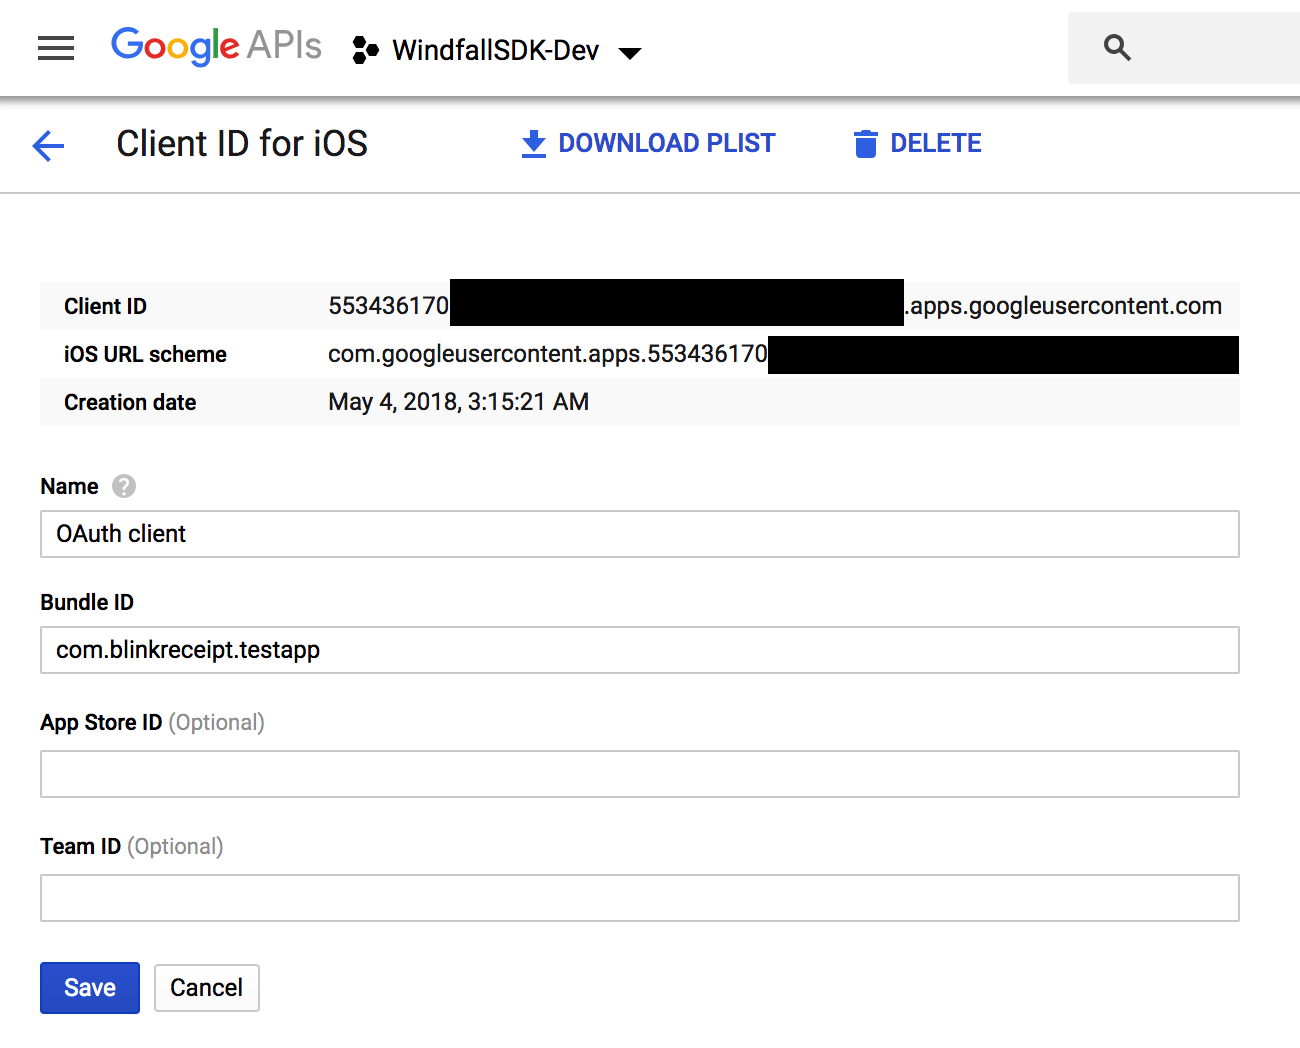
Provide this Client ID via the
BREReceiptManager.googleClientIdpropertyGmail uses OAuth to authenticate user accounts via a modal view controller provided by Google’s SDK. Here is how you invoke it from within your own view controller:
[[BREReceiptManager shared] beginOAuthForProvider:BREReceiptProviderGmail
                               withViewController:self
                                    andCompletion:^(NSError *error) {

                                        if (error == nil) {
                                            //Account successfully authenticated
                                        } else {
                                            //Failed to authenticate
                                        }
                                    }];
- In order to handle the response from the OAuth process, you need to add the following to your app delegate:
#import <BlinkEReceipt/BREReceiptManager.h>
...
- (BOOL)application:(UIApplication *)app
            openURL:(NSURL *)url
            options:(NSDictionary *)options
{
    return [[BREReceiptManager shared] openURL:url
                                       options:options
                                       provider:BREReceiptProviderGmail];
}
- Lastly, follow Google’s instructions to add the necessary URL scheme to your app
Outlook (OAuth)
Go to the Azure Portal, choose Manage Azure Active Directory, then App Registrations from the left menu, and click New Registration.
Enter a name for your app, choose the option to support accounts in any Azure AD directory as well as personal Microsoft accounts, and choose “Public client/native” for the Redirect URI type. Don’t worry about the field value. Click Register.
This will generate an Application (client) ID which you should note for later.
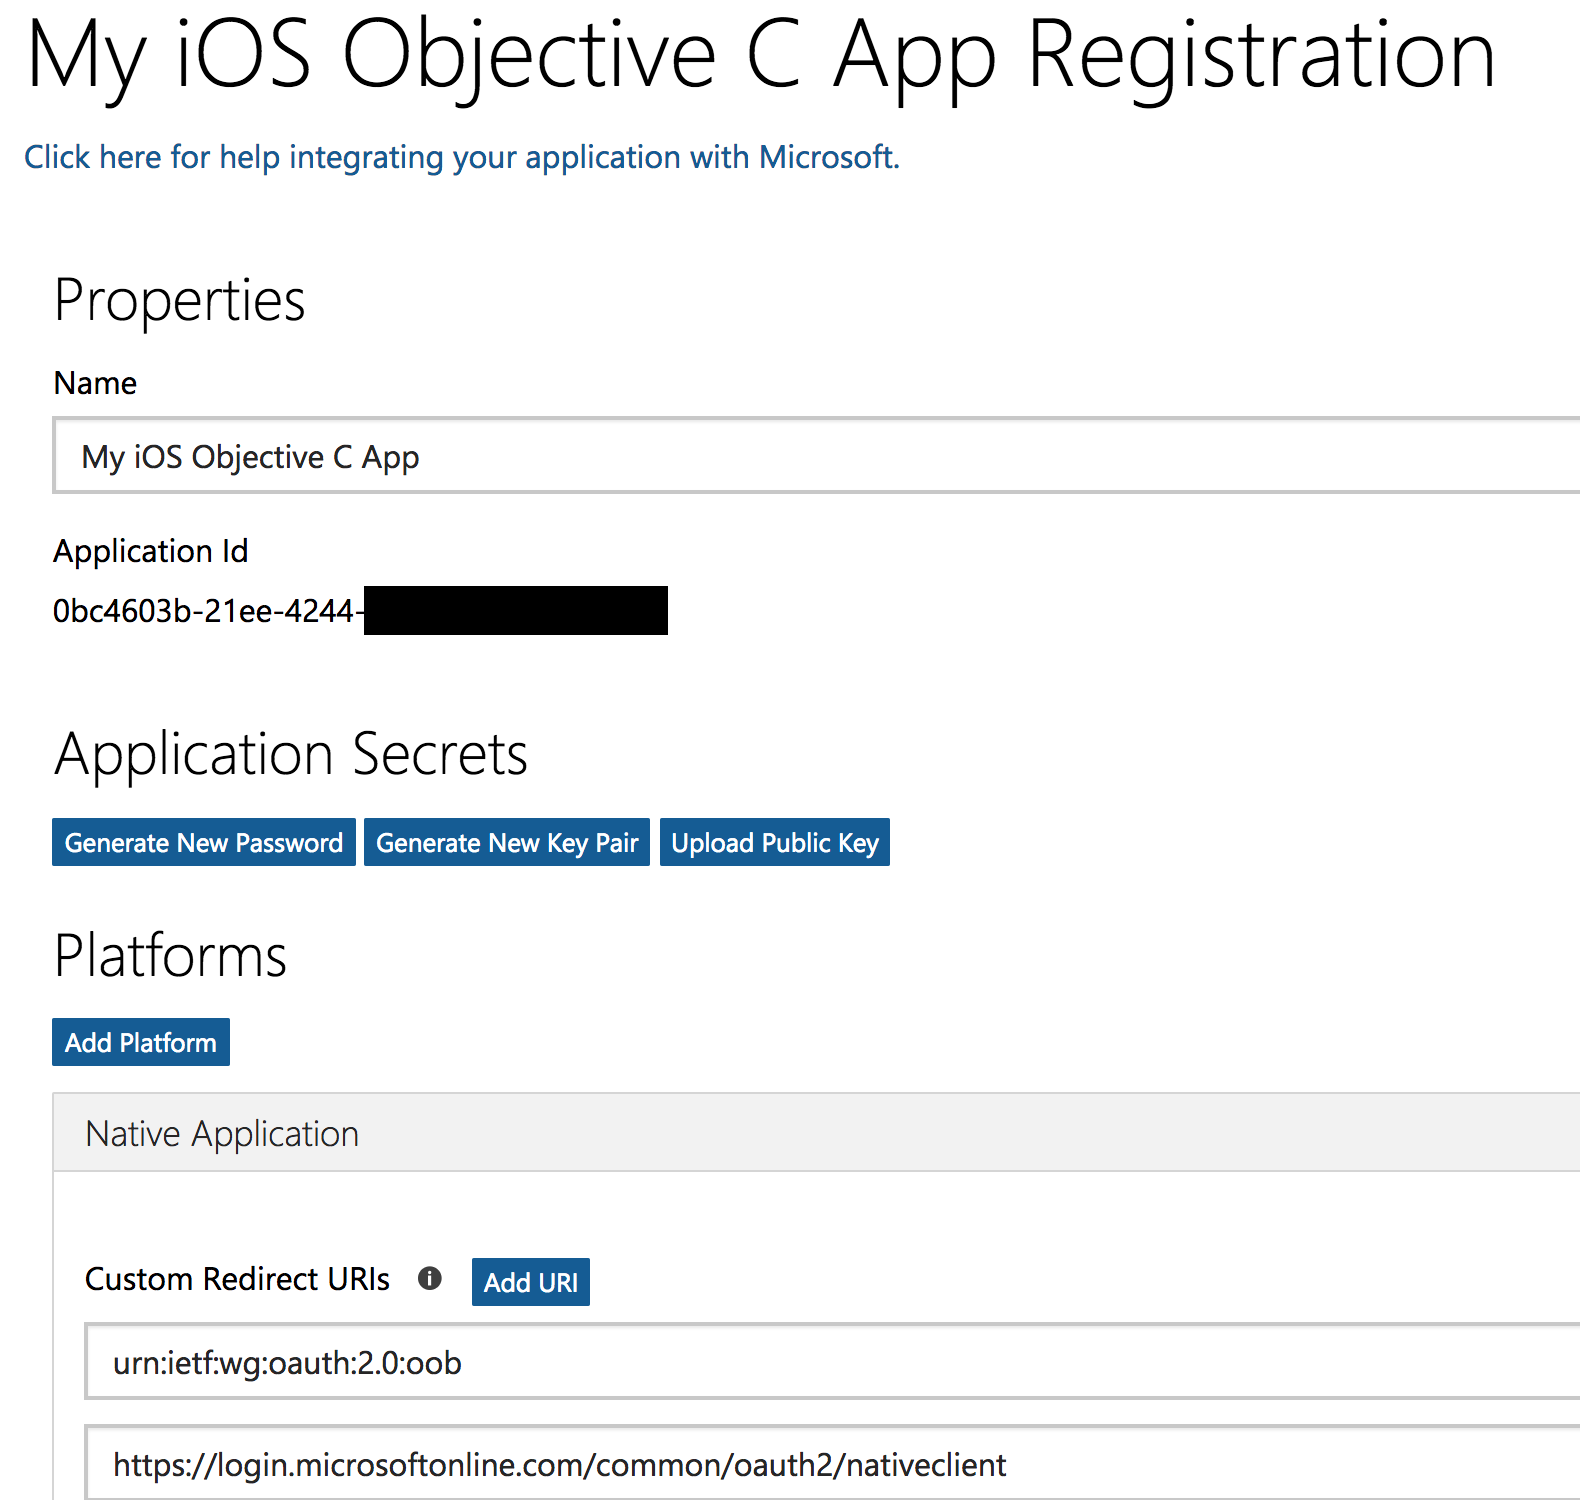
Now click “Add a Redirect URI” on the right side
Click “Add a Platform” and choose “iOS / MacOS”
Enter your app’s bundle ID and click “Configure” and then click “Done”
In your code, set the Client ID into the
BREReceiptManager.outlookClientIdpropertyOutlook uses OAuth to authenticate user accounts via a modal view controller provided by Microsoft’s SDK. Here is how you invoke it from within your own view controller:
[[BREReceiptManager shared] beginOAuthForProvider:BREReceiptProviderOutlook
                               withViewController:self
                                    andCompletion:^(NSError *error) {

                                        if (error == nil) {
                                            //Account successfully authenticated
                                        } else {
                                            //Failed to authenticate
                                        }
                                    }];
- Add the following to your app delegate:
#import <BlinkEReceipt/BREReceiptManager.h>
...
- (BOOL)application:(UIApplication *)app
            openURL:(NSURL *)url
            options:(NSDictionary *)options
{
    return [[BREReceiptManager shared] openURL:url
                                       options:options
                                       provider:BREReceiptProviderOutlook];
}
Add a URL handler for the scheme
msauth.[your_bundle_id]to your app’sInfo.plist(or via the Target settings interface in XCode)Add an array key to your app’s
Info.plistfile calledLSApplicationQueriesSchemesand add 2 string values to it:msauthv2andmsauthv3Add a Keychain Group to your target (in your target’s settings under Signing & Capabilities -> Keychain Sharing in XCode) named
com.microsoft.adalcache
Yahoo, AOL, Gmail (IMAP Integration)
In order to connect to Yahoo or AOL via IMAP, or to connect to Gmail via IMAP (if the SDK integration above is not possible), some additional setup is required in the user’s respective email account:
For Yahoo/AOL, a user must create an “App Password” (which is different than their regular account password).
For Gmail, there are 2 ways that a user can access their account through IMAP:
- If they have a special setting called “Less Secure Apps” enabled -OR-
- If they generate an “Application Password” and use that to authenticate
Our SDK attempts to automate this setup for all providers “behind the scenes”:
- Create your own UI to collect the user’s email and regular account password, and instantiate a
BRIMAPAccountobject with the credentials:
BRIMAPAccount *imapAcct = [[BRIMAPAccount alloc] initWithProvider:BREReceiptProviderYahoo
                                                            email:userEmail
                                                         password:userPassword];
- Then call the special IMAP setup method which will attempt to login to the user’s account create an App Password (or in the case of Gmail, determine if Less Secure Apps is already enabled):
[[BREReceiptManager shared] setupIMAPForAccount:imapAcct
                                 viewController:self
                                 withCompletion:^(BRSetupIMAPResult result) {

    if (result == BRSetupIMAPResultCreatedAppPassword) {
        NSLog(@"Successfully created app password.");
    } else if (result == BRSetupIMAPResultEnabledLSA) {
        NSLog(@"Successfully enabled Gmail Less Secure Apps.");
    }
}];
- If this succeeds, you can then verify the connection to the IMAP server:
[[BREReceiptManager shared] verifyImapAccount:imapAcct withCompletion:^(BOOL success, NSError *error) {

    if (success) {
        //Credentials verified
    } else {
        //Failed to verify credentials
    }

}];
Retrieving and Parsing E-Receipts
Once you have successfully integrated one or more mail providers, and the user has successfully authenticated their account(s), you can begin retrieving and parsing e-receipts either locally or remotely:
Local
In this method, the user’s device initiates the search of the user’s inbox directly (i.e. requests are made from the user’s device directly to the respective email provider) and the results are parsed immediately and returned to the client app in a callback:
[[BREReceiptManager shared] getEReceiptsWithCompletion:^(NSArray<BRScanResults *> *receipts, BREmailAccount *account, NSError *error) {

    if (error == nil) {
        NSLog(@"Found %lu new e-receipt orders", (unsigned long)scanResults.count);

    } else {
        NSLog(@"Error retrieving e-receipts");
    }
}];
This will connect to the user’s linked email account(s) and search for new e-receipts from all supported retailers since the most recent successful retrieval of e-receipts.
If any orders are found, they will be returned as an array of BRScanResults objects. These objects contain many of the standard fields that are populated when scanning a physical receipt, but also contain certain properties that are unique to e-receipts such as:
BRScanResults.ereceiptOrderNumBRScanResults.ereceiptRawHTML
The BRScanResults.products array is composed of BRProduct objects as usual, but with 1 additional property: BRProduct.shippingStatus
You can control how far back to search in the user’s email for e-receipts via the BREReceiptManager.dayCutoff and BREReceiptManager.dateCutoff properties. The BREReceiptManager.searchUntilDate controls how recently to search until (i.e. if you do not want to search until the present day). The default setting is to search the previous 14 days.
Remote
Searching a user’s inbox and parsing results can take some time, and if the user exits the app during this process, no results will be received. As a result we have created a method to perform the searching and parsing remotely in an asynchronous fashion.
The authentication for each email provider remains on device, since we do not warehouse any user credentials server side. However instead of invoking -[BREReceiptManager getEReceiptsWithCompletion:], you will call -[BREReceiptManager startRemoteEReceiptScrapeForAccount:withCompletion:].
This method queues up a scraping job remotely and returns a job ID (or an error if the job could not be succesfully queued). This job ID will be included in the results payload that is posted to the results endpoint that you have configured for remote scraping (see below).
For ease of debugging, the BREReceiptManager.remoteScrapeClientEndpoint can be used to override the results endpoint that you have configured server side using the configuration API.
If you would like to override the cutoff date on a user-by-user basis, this can be achieved with the BREReceiptManager.remoteScrapeUserDateCutoff propery.
Configuration API
In order to use the remote scraping method, you will need to configure your server side setup using our configuration API: https://app.swaggerhub.com/apis-docs/blinkreceipt/ereceipts
Please reach out to your account point of contact to initiate this process.
Aggregation
A single online (or in-store) order can generate a series of emails - order confirmation, shipping update, item substitution, delivery confirmation, etc.
You can makes use of our aggregation system in order to receive scrape results in which e-receipts pertaining to the same order are returned together.
This is as simple as enabling the BREReceiptManager.aggregateResults property (there is a corresponding property in the Configuration API for remote scraping).
When aggregation is turned on, the top level results in each BRScanResults object that is returned are the aggregated, most recent results for a given order. Inside this object, you will find the BRScanResults.ereceiptComponentEmails array populated with all of the component emails that our system determined are part of this order. Each item is itself a BRScanResults object. If some of the emails from this order were initially parsed during a previous scrape session, you won’t find all the data from those emails populated in the component results structure, rather just the blinkReceiptId will appear (so that you would be able to correlate that with results from the earlier scrape sessions if it is important to be able to see the component results).